1st August 2019 • 6 min read
Learn ESLint concepts, not rules

Seif Ghezala
A solution is useless if it doesn't solve a problem. So let's start with the problems we have when writing JavaScript code.
Problem #1: JavaScript is not compiled while you write it
Whether we are writing JavaScript for the browser or Node, the code is compiled in the same target engine that will run it. While writing a JavaScript code, we have no idea about its validity before it is compiled and run in the engine. So if we write the following code:
1var y = x + 1;We'll have to wait until it's compiled to get an error about the fact that xis not defined.
Problem #2: JavaScript compilation is loose
A lot of errors are only reported only at runtime. Let's look at the following example:
1function foo() {2 var y = x + 1;3}
If you ship this code, it will run fine until foo is actually called. Although the function has an obvious error because x is never defined, it is only detected at runtime.
ESLint to the rescue
You can be a very careful and skilled developer, and still ship errors because of the 2 previous problems. One solution to this is to enforce some rules on your code and make sure they are followed at the time you are writing your code. This is exactly what linting tools such as ESLint help you accomplish. For example, the previous 2 bugs could be signaled by ESLint if you configure it to detect using undeclared variables. Now that we understand the usefulness of ESLint, let's learn how to use it :)
1$ npm i--save - dev eslintor
1$ yarn add - D eslintor using any other packages manager tool of your preference.
Let's create a simple index.js file and put our foo function in it:
1// index.js2function foo() {3 var y = x + 1;4}
You can then run ESLint from the command line as follow:
1$./ node_modules /.bin / eslint index.jsor through npx (in this case you don't even have to install ESLint):
1$ npx eslint index.jsor if you're using yarn:
1$ yarn run eslint index.jsYou don't see anything? It's ok, it's expected. Jump to the next section 👇.
ESLint doesn't report anything without configuration. Let's create a configuration file .eslintrc and make ESLint report the use of undeclared variables:
1// .eslintrc2{3 "rules": {4 "no-undef": "error"5 }6}
In this case, we are telling ESLint to report the use of undeclared variables as an error.
Now if you run ESLint, you should see the following error reported:
13: 11 error 'x' is not defined no - undefWe know how to configure and run ESLint in the terminal. That's actually great! By doing just that, we increased the reliability of our code when it comes to using undeclared variables. This solves our second problem. But what about reporting errors while we are writing code?
There are plugins for ESLint in most editors. For example, you can get ESLint feedback in VSCode by installing this plugin. After enabling ESLint in VSCode, you should see the previous ESLint error directly in your code:
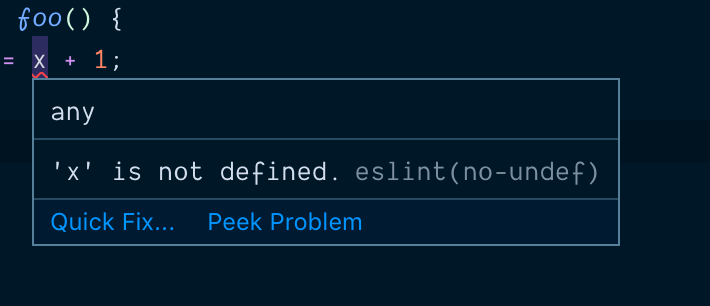
ESLint error in VSCode
It's also dynamic. ESLint is re-run every time you type. So if you declare x, the error will immediately disappear:
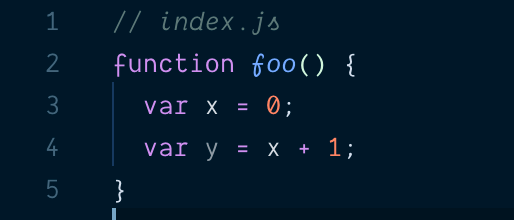
ESLint in VSCode after resolving the error
Rules violations don't have to be reported as errors. For example, we can configure an ESLint rule to only report warnings:
1// .eslintrc2{3 "rules": {4 "no-undef": "warn"5 }6}
We can also turn off a rule:
1// .eslintrc2{3 "rules": {4 "no-undef": "off"5 }6}
ESLint ships with a bunch of built-in rules like the one we saw before. You can find detailed documentation about every single one of them here.
One of the features that make ESLint a truly pluggable tool is that you can easily consume pre-existing configurations in your own .eslintrc file.
eslint: recommended is a configuration that ships with ESLint and that you can easily consume using the extend property:
1// .eslintrc2{3 "extends": "eslint:recommended"4}
This will automatically configure several rules. If we look at our index.js file, we'll see that ESLint automatically reported 3 errors:

ESLint errors after extending eslint:recommended
Since we are extending a configuration, we can customize it. In fact, we can customize the configuration of any rule by overriding it in the rules block. For example, we can turn off the no-unused-vars rule as follow:
1// .eslintrc2{3 "extends": "eslint:recommended",4 "rules": {5 "no-unused-vars": "off"6 }7}
If we go back to the index.js file, we'll see that ESLint doesn't report errors from that rule anymore:

ESLint errors after disabling no-unused-vars
If you're already impressed by ESLint extensibility, now you're gonna be blown away 🤯. You can actually import & use rules created by anyone. A set of third-party rules is called a plugin. By convention, ESLint plugins names have the prefix eslint - plugin - . For example, eslint-plugin-node is a plugin that has ESLint rules specific to NodeJS. After installing the npm package, we can load its rules by adding its name (we can omit the eslint-plugin prefix) in the plugins configuration property:
1// .eslintrc2{3 "plugins": ["node"]4}
At this point, the rules are ready and configurable. We can hand-pick some of them and configure them:
1// .eslintrc2{3 "plugins": ["node"],4 "rules": {5 "node/prefer-promises/dns": "error",6 "node/prefer-promises/fs": "warn"7 }8}
Most plugins ship as well with shareable configurations. Therefore, you also have the option to extend these configurations and overriding them:
1// .eslintrc2{3 "plugins": ["node"],4 "extends": ["eslint:recommended", "plugin:node/recommended"],5 "rules": {6 "node/prefer-promises/dns": "error",7 "node/prefer-promises/fs": "warn"8 }9}
Notice how we extended more than one shareable configuration. We only had to pass an array of the confugurations we wanted to extend (eslint:recommended and plugin:node/recommended) and ESLint took care of merging them.