16th November 2020 • 7 min read
How to build an Auto-Playing Slideshow with React

Omar Benseddik
In this article we'll build an auto-playing slideshow using React.
The article is divided into two sections:
The trick
Functionality
Here's the final result (Codepen link here):
Our Slideshow component is divided in three containers:
slideshow
slideshowSlider
slide
Here's a sketch to visualize the structure:
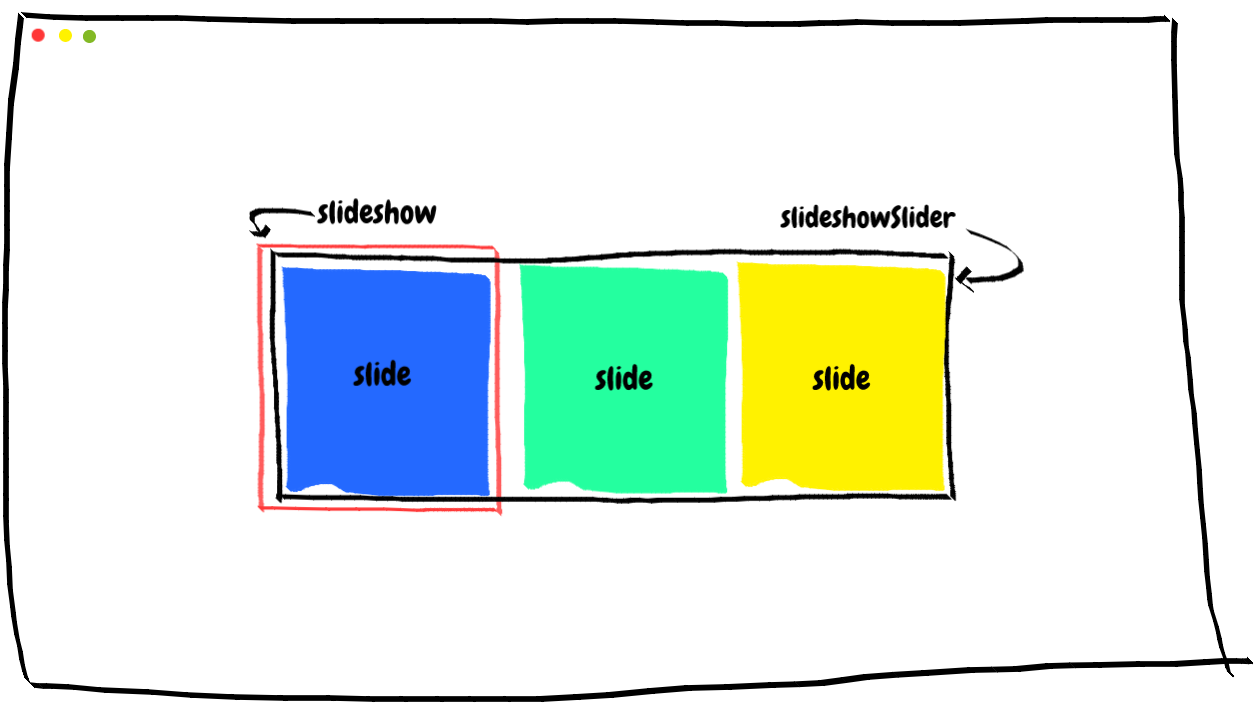
Slideshow structure 1
What is visible to the user is what is shown within the red box (the container slideshow).
After a couple of seconds, the container slideshowSlider will move to the left to expose the next container slide, as shown below:
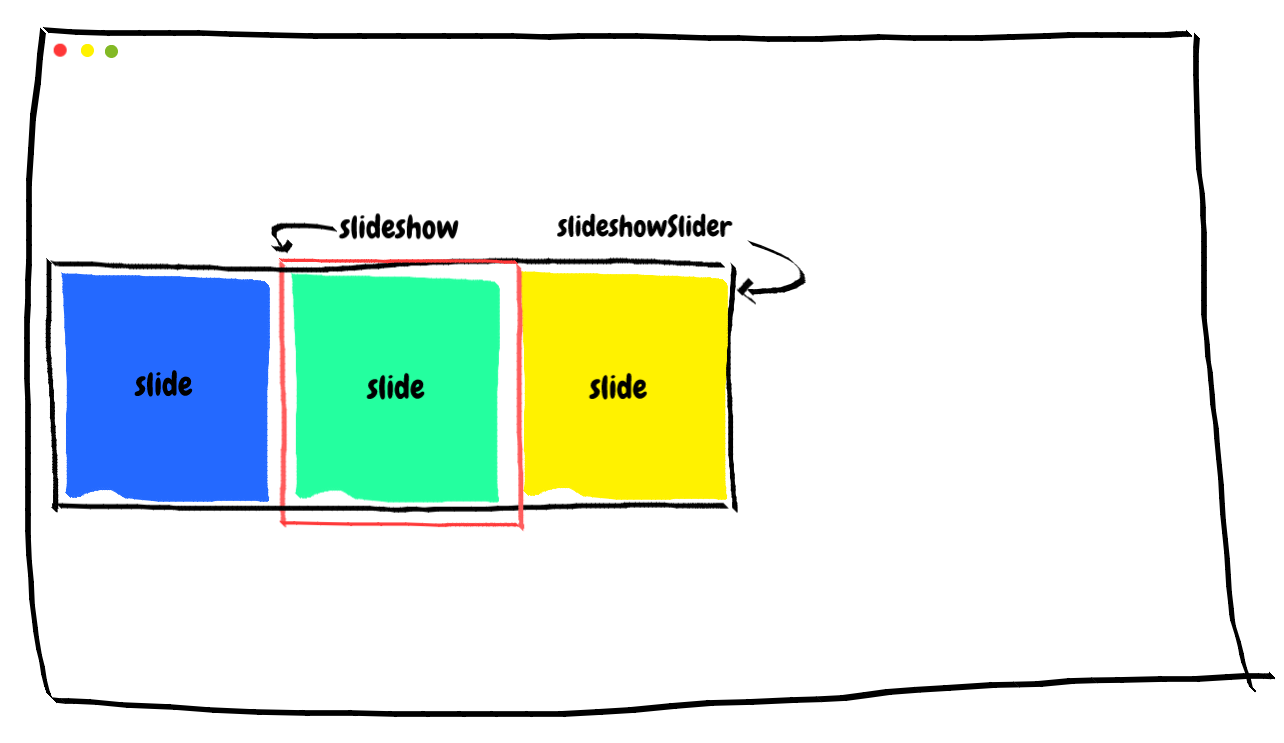
Slideshow structure 1
As you can imagine, after a couple of seconds the container slideshowSlider will move again and what will be shown to the user is the yellow container slide.
A couple of seconds later, the container slideshowSlider will go back to its original position and we'll see the blue container slide again.
And so on.
Here's the corresponding markup:
1function Slideshow() {2 return (3 <div className="slideshow">4 <div className="slideshowSlider">5 <div className="slide"></div>6 </div>7 </div>8 );9}
Step 1: show colored slides
Let's use the previous markup to show a few colored slides:
1const colors = ["#0088FE", "#00C49F", "#FFBB28"];23function Slideshow() {4 return (5 <div className="slideshow">6 <div className="slideshowSlider">7 {colors.map((backgroundColor, index) => (8 <div className="slide" key={index} style={{ backgroundColor }}/>9 ))}10 </div>11 </div>12 );13}
Step 2: styling
First, let's style the parent container slideshow:
1/* Slideshow */23.slideshow {4 margin: 0 auto;5 overflow: hidden;6 max-width: 500px;7}
We center it with margin: 0 auto, set a max-width to it and make the content flowing outside the element's box invisible with overflow:hidden.
Now let's style slide:
1/* Slideshow */23.slideshow {4 margin: 0 auto;5 overflow: hidden;6 max-width: 500px;7}89.slide {10 height: 400px;11 width: 100%;12 border-radius: 40px;13}
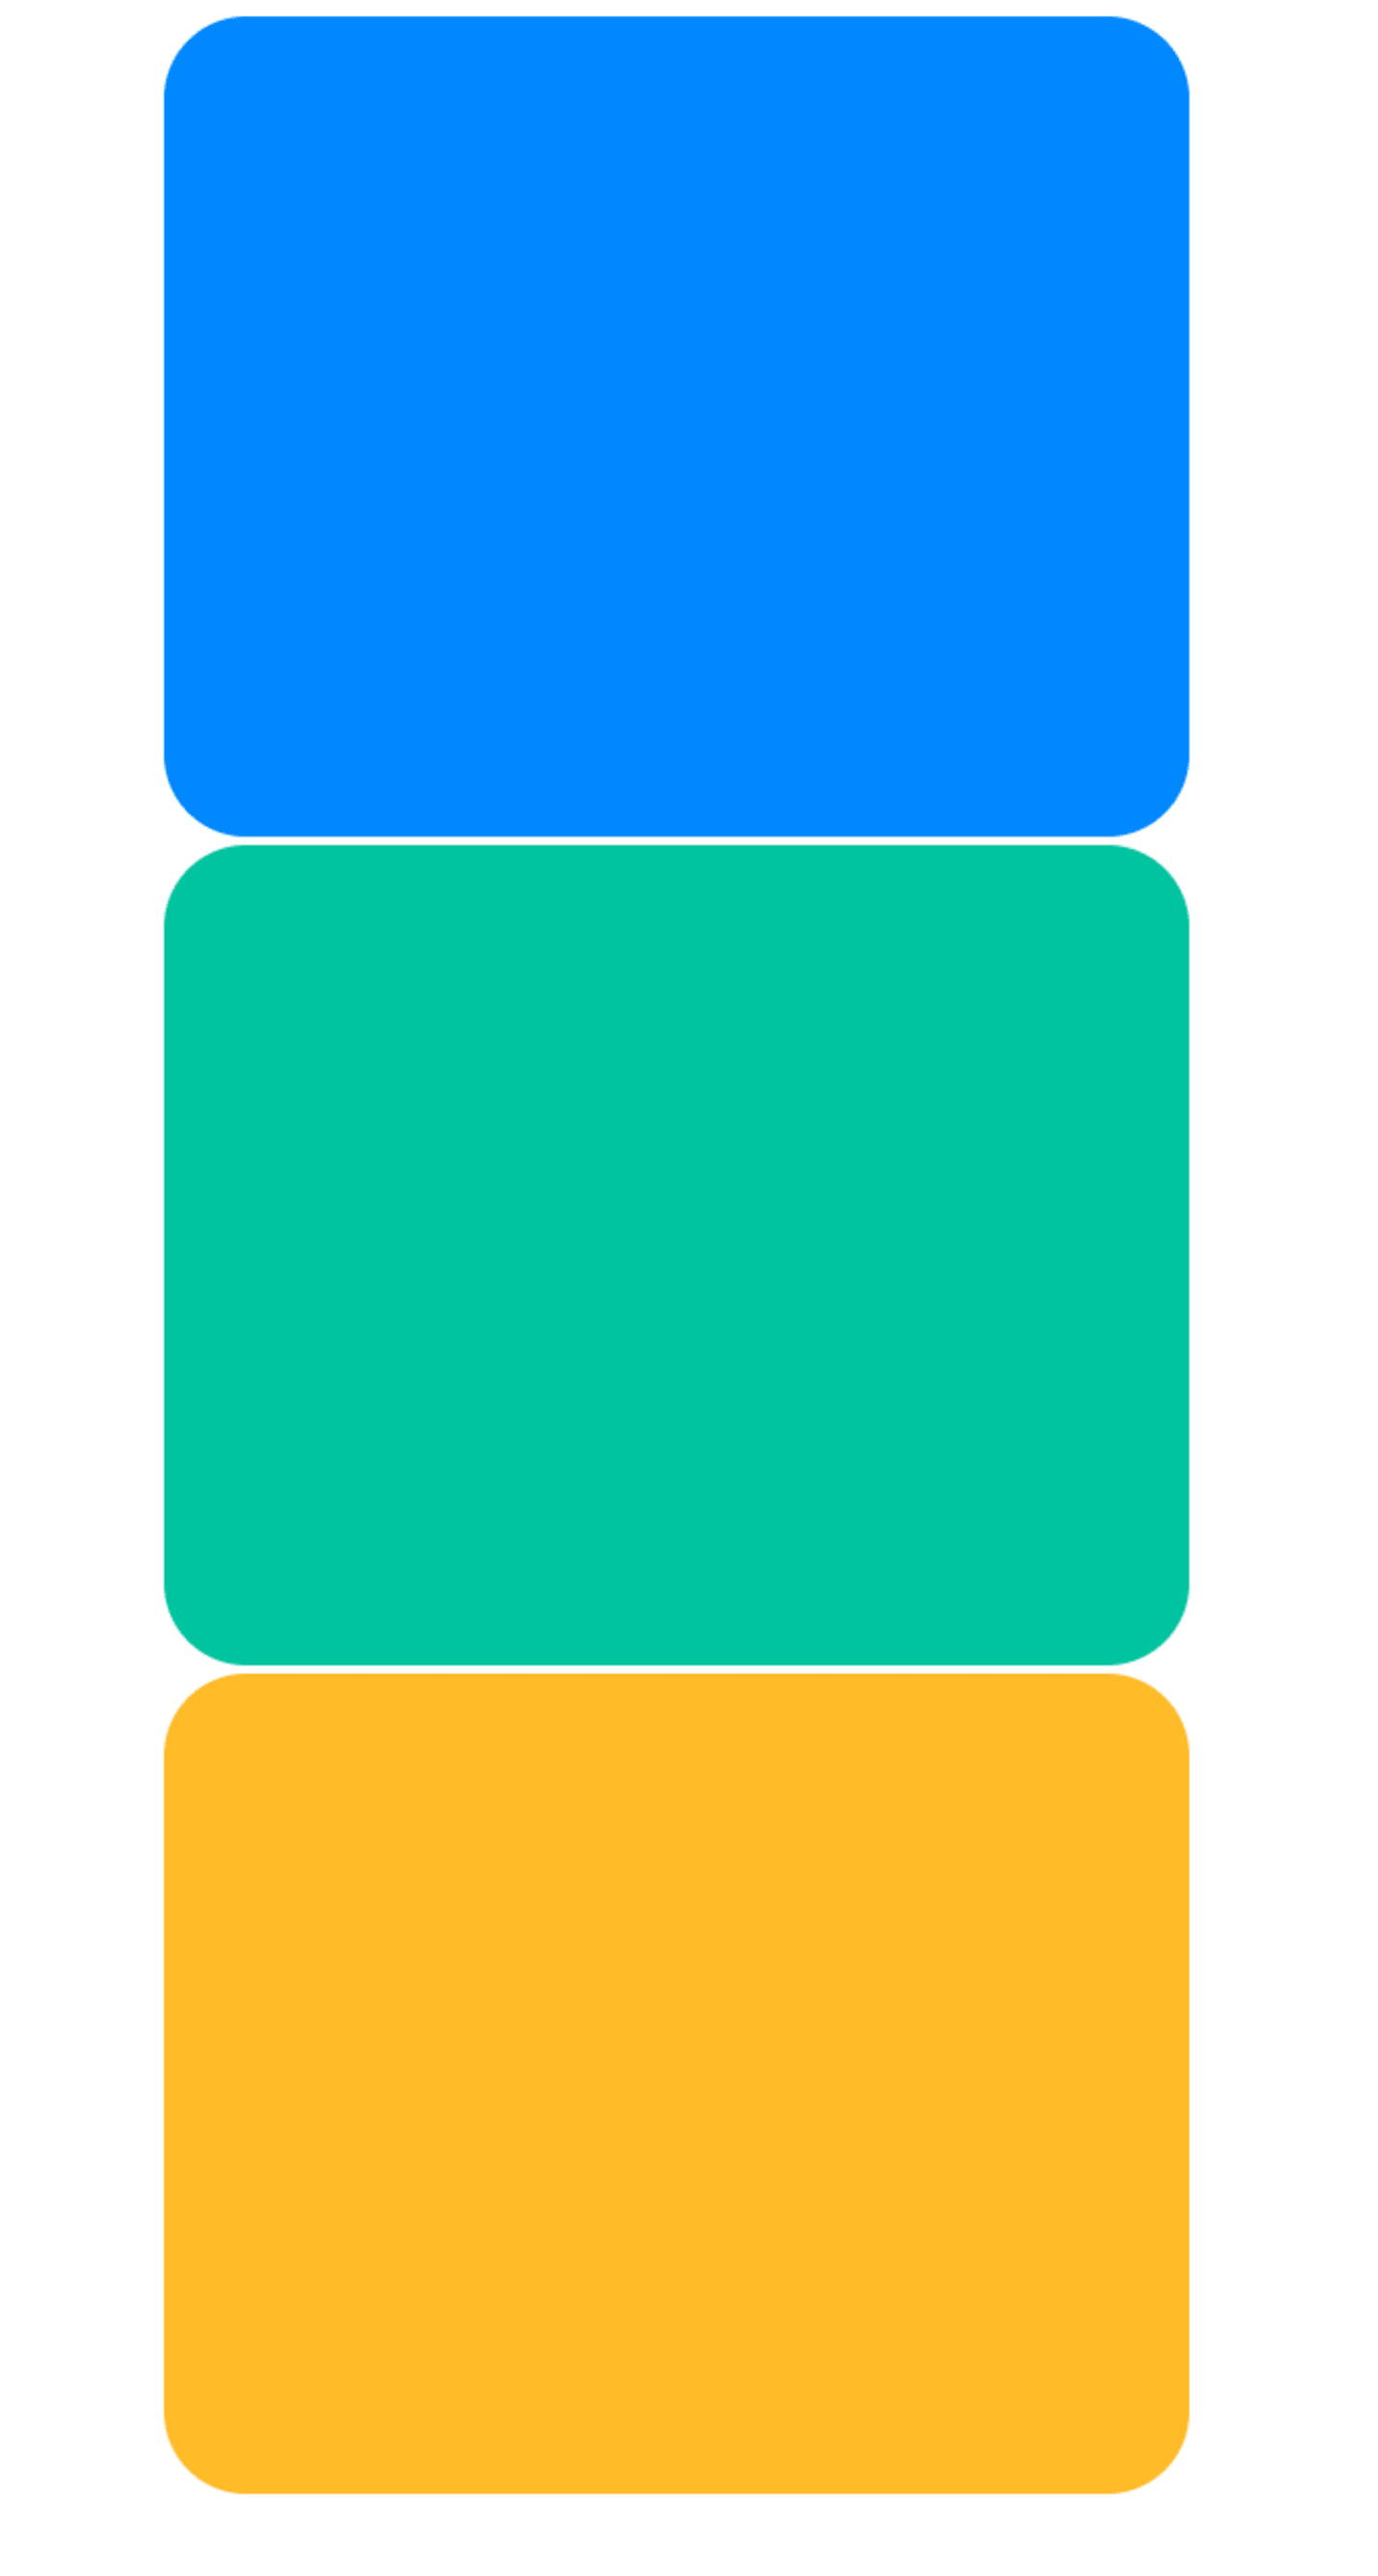
We get:

Slides are on top of each other
We don't want to have the slides one on top of each other, but we want them one next to each other.
For that, we'll set display: inline-block since divs are set with display:block by default, which makes them start in a new line:
1/* Slideshow */23.slideshow {4 margin: 0 auto;5 overflow: hidden;6 max-width: 500px;7}89.slide {10 display: inline-block;1112 height: 400px;13 width: 100%;14 border-radius: 40px;15}
We get:
Not much changed
Not much changed, and it still looks like we have display:block and that is because divs wrap to the next line when there's no space in the container. Because our slides take 100% of the slideshow's width each, there is no space in the container.
We'll use white-space: nowrap in the slides container so we never wrap to the next line:
1/* Slideshow */23.slideshow {4 margin: 0 auto;5 overflow: hidden;6 max-width: 500px;7}8.slideshowSlider {9 white-space: nowrap;10}1112.slide {13 display: inline-block;1415 height: 400px;16 width: 100%;17 border-radius: 40px;18}
We get:

No more wrapping to the next line
We no longer have divs wrapping to the next line.
Step 3: create the buttons
Now that we have the structure of the color containers, let's add the buttons (dots) beneath them.
We'll map again through the array again and add a dot for each array element:
1const colors = ["#0088FE", "#00C49F", "#FFBB28"];23function Slideshow() {4 return (5 <div className="slideshow">6 <div className="slideshowSlider">7 {colors.map((backgroundColor, index) => (8 <div9 className="slide"10 key={index}11 style={{ backgroundColor }}12 ></div>13 ))}14 </div>1516 <div className="slideshowDots">17 {colors.map((_, idx) => (18 <div key={idx} className="slideshowDot"></div>19 ))}20 </div>21 </div>22 );23}
Let's style the buttons:
1/* Slideshow */23.slideshow {4 margin: 0 auto;5 overflow: hidden;6 max-width: 500px;7}89.slideshowSlider {10 white-space: nowrap;11}1213.slide {14 display: inline-block;1516 height: 400px;17 width: 100%;18 border-radius: 40px;19}2021/* Buttons */22.slideshowDots {23 text-align: center;24}25.slideshowDot {26 display: inline-block;27 height: 20px;28 width: 20px;29 border-radius: 50%;30 cursor: pointer;31 margin: 15px 7px 0px;32 background-color: #c4c4c4;33}
We get:
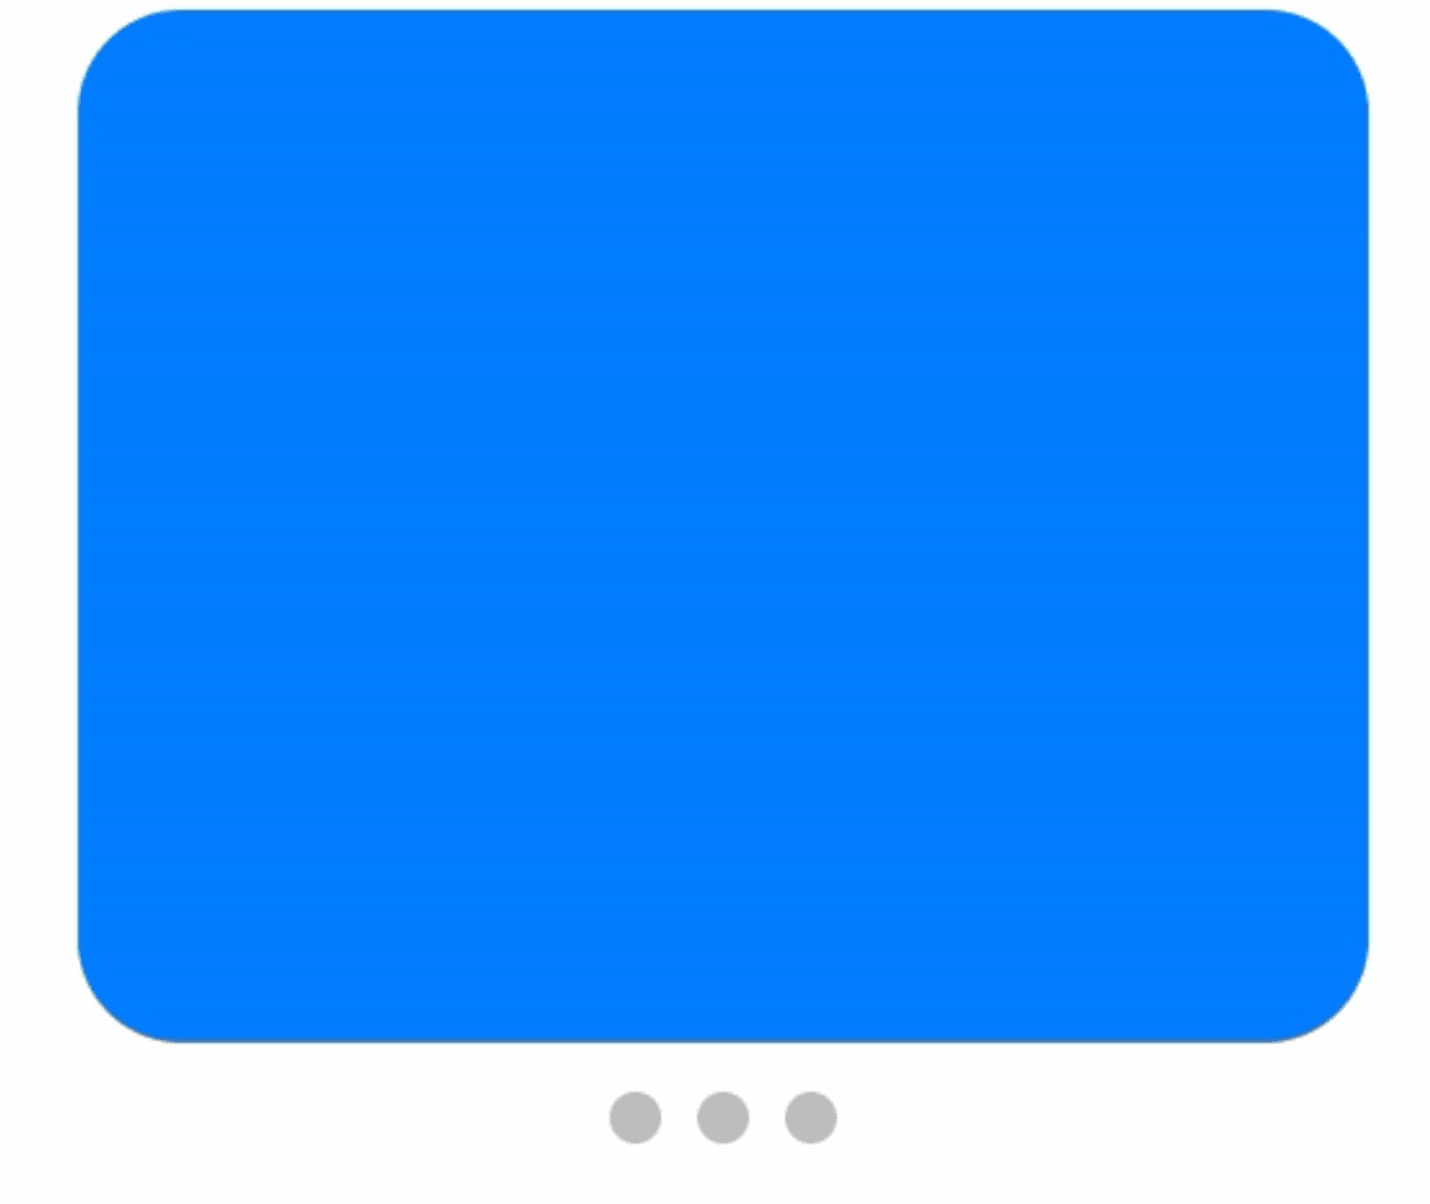
Color container and buttons (dots) are ready
We are done with the structure and the styling. Let's now focus on the functionality of the slideshow.
If you noticed in the sketch above, we moved the position of slideshowSlider to the left to display different color containers in its parent div slideshow.
Notice how the blue container below is moving to the left as a result of slideshowSlider moving:
To achieve this, we will use transform: translate3d (or you can use transform: translate).
What we essentially want to do here is move the position of slideshowSlider by 0% when index is 0, -100% when index is 1 and by -200% when index is 2.
To keep tracking of the currently displayed index, we use useState and we initialize it with 0:
1const colors = ["#0088FE", "#00C49F", "#FFBB28"];23function Slideshow() {4 const [index, setIndex] = React.useState(0);56 return (7 <div className="slideshow">8 <div9 className="slideshowSlider"10 style={{ transform: `translate3d(${-index * 100}%, 0, 0)` }}11 >12 {colors.map((backgroundColor, index) => (13 <div14 className="slide"15 key={index}16 style={{ backgroundColor }}17 ></div>18 ))}19 </div>2021 <div className="slideshowDots">22 {colors.map((_, idx) => (23 <div key={idx} className="slideshowDot"></div>24 ))}25 </div>26 </div>27 );28}
To make the slideshow automatic, we change the index every 2,5 seconds using setTimeout.
Since this is a side effect, we do so with useEffect.
Since we want to perform this action every time the index changes, we put the index in the dependency array passed to useEffect:
1const colors = ["#0088FE", "#00C49F", "#FFBB28"];2const delay = 2500;34function Slideshow() {5 const [index, setIndex] = React.useState(0);67 React.useEffect(() => {8 setTimeout(9 () =>10 setIndex((prevIndex) =>11 prevIndex === colors.length - 1 ? 0 : prevIndex + 112 ),13 delay14 );1516 return () => {};17 }, [index]);1819 return (20 <div className="slideshow">21 <div22 className="slideshowSlider"23 style={{ transform: `translate3d(${-index * 100}%, 0, 0)` }}24 >25 {colors.map((backgroundColor, index) => (26 <div27 className="slide"28 key={index}29 style={{ backgroundColor }}30 ></div>31 ))}32 </div>3334 <div className="slideshowDots">35 {colors.map((_, idx) => (36 <div key={idx} className="slideshowDot"></div>37 ))}38 </div>39 </div>40 );41}
Every 2500 milliseconds (2.5 seconds), the setIndex function will be called. It will first check if the current index is equal to the array's length minus one, that way it knows if to move to the next index or start from scratch.
For example, if we're at index 0, which is not equal to the array length minus one (3-1=2), it will update the index to be 1.
However, if we're at index 2, which is equal to the array's length minus one (3-1=2), it will update the index to be 0.
We get:

We want a smoother transition, so let's go back to the CSS and add transition to slideshowSlider:
1/* Slideshow */23.slideshow {4 margin: 0 auto;5 overflow: hidden;6 max-width: 500px;7}89.slideshowSlider {10 white-space: nowrap;11 transition: ease 1000ms;12}1314.slide {15 display: inline-block;1617 height: 400px;18 width: 100%;19 border-radius: 40px;20}2122/* Buttons */2324.slideshowDots {25 text-align: center;26}2728.slideshowDot {29 display: inline-block;30 height: 20px;31 width: 20px;32 border-radius: 50%;3334 cursor: pointer;35 margin: 15px 7px 0px;3637 background-color: #c4c4c4;38}
Now it's better:

Slideshow animation is better with `transition`
The slideshow works, but the buttons are not reflecting the active slide.
So far, all our buttons are grey. Let's add a className "active" to color in purple the button corresponding to the current slide index (index state value).
While mapping through the colors, we check if the index of the slide is equal to the index of the dot, if it is the case, it takes the additional className active to reflect the change in color:
1const colors = ["#0088FE", "#00C49F", "#FFBB28"];2const delay = 2500;34function Slideshow() {5 const [index, setIndex] = React.useState(0);67 React.useEffect(() => {8 setTimeout(9 () =>10 setIndex((prevIndex) =>11 prevIndex === colors.length - 1 ? 0 : prevIndex + 112 ),13 delay14 );1516 return () => {};17 }, [index]);1819 return (20 <div className="slideshow">21 <div22 className="slideshowSlider"23 style={{ transform: `translate3d(${-index * 100}%, 0, 0)` }}24 >25 {colors.map((backgroundColor, index) => (26 <div27 className="slide"28 key={index}29 style={{ backgroundColor }}30 ></div>31 ))}32 </div>3334 <div className="slideshowDots">35 {colors.map((_, idx) => (36 <div37 key={idx}38 className={`slideshowDot${index === idx ? " active" : ""}`}39 ></div>40 ))}41 </div>42 </div>43 );44}
Now let's add styles corresponding to the className active:
1/* Slideshow */23.slideshow {4 margin: 0 auto;5 overflow: hidden;6 max-width: 500px;7}89.slideshowSlider {10 white-space: nowrap;11 transition: ease 1000ms;12}1314.slide {15 display: inline-block;1617 height: 400px;18 width: 100%;19 border-radius: 40px;20}2122/* Buttons */2324.slideshowDots {25 text-align: center;26}2728.slideshowDot {29 display: inline-block;30 height: 20px;31 width: 20px;32 border-radius: 50%;3334 cursor: pointer;35 margin: 15px 7px 0px;3637 background-color: #c4c4c4;38}3940.slideshowDot.active {41 background-color: #6a0dad;42}
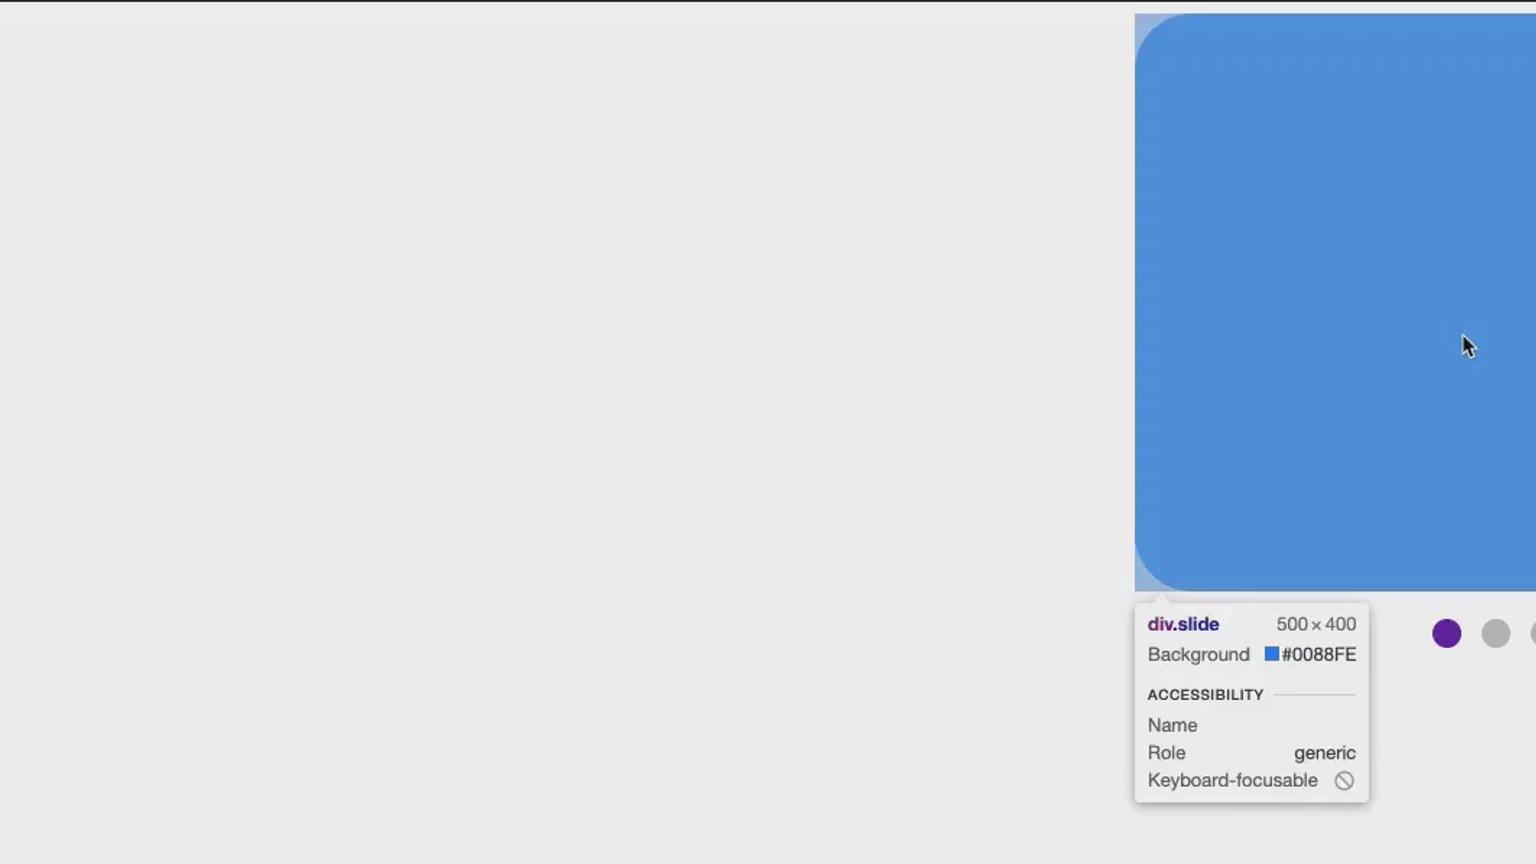
Our buttons now reflect the changes in the slideshow:

Now let's make them clickable, so when we click on the first dot we display the blue container, if we click on the second dot we display the green contain and if we click on the third dot we display the yellow container.
To achieve this, we change the index of the slide to be the same as the index of the button:
1const colors = ["#0088FE", "#00C49F", "#FFBB28"];2const delay = 2500;34function Slideshow() {5 const [index, setIndex] = React.useState(0);67 React.useEffect(() => {8 setTimeout(9 () =>10 setIndex((prevIndex) =>11 prevIndex === colors.length - 1 ? 0 : prevIndex + 112 ),13 delay14 );1516 return () => {};17 }, [index]);1819 return (20 <div className="slideshow">21 <div22 className="slideshowSlider"23 style={{ transform: `translate3d(${-index * 100}%, 0, 0)` }}24 >25 {colors.map((backgroundColor, index) => (26 <div27 className="slide"28 key={index}29 style={{ backgroundColor }}30 ></div>31 ))}32 </div>3334 <div className="slideshowDots">35 {colors.map((_, idx) => (36 <div37 key={idx}38 className={`slideshowDot${index === idx ? " active" : ""}`}39 onClick={() => {40 setIndex(idx);41 }}42 ></div>43 ))}44 </div>45 </div>46 );47}
It works, however, because we didn't clear our setTimeout, by clicking multiple times on the dots we've distorted the value of the timer:

To avoid such scenario, we'll clear our setTimeout by using the clearTimeout method. The ID value returned by setTimeout() is used as the parameter for the clearTimeout().
We will store it in a variable and use clearTimeout() to start the timer from 0, to avoid the scenario in the GIF above.
To store the variable, we use useRef to create an object whose value is accessed with the object's current property.
1const colors = ["#0088FE", "#00C49F", "#FFBB28"];2const delay = 2500;34function Slideshow() {5 const [index, setIndex] = React.useState(0);6 const timeoutRef = React.useRef(null);78 React.useEffect(() => {9 timeoutRef.current = setTimeout(10 () =>11 setIndex((prevIndex) =>12 prevIndex === colors.length - 1 ? 0 : prevIndex + 113 ),14 delay15 );1617 return () => {};18 }, [index]);1920 return (21 <div className="slideshow">22 <div23 className="slideshowSlider"24 style={{ transform: `translate3d(${-index * 100}%, 0, 0)` }}25 >26 {colors.map((backgroundColor, index) => (27 <div28 className="slide"29 key={index}30 style={{ backgroundColor }}31 ></div>32 ))}33 </div>3435 <div className="slideshowDots">36 {colors.map((_, idx) => (37 <div38 key={idx}39 className={`slideshowDot${index === idx ? " active" : ""}`}40 onClick={() => {41 setIndex(idx);42 }}43 ></div>44 ))}45 </div>46 </div>47 );48}
Now we'll create a function resetTimeout to clearTimeout, and it'll be called every time the index of the slide changes.
To cleanup after the effect (when the component gets destroyed), we call the resetTimeout function to clear the timeout:
1const colors = ["#0088FE", "#00C49F", "#FFBB28"];2const delay = 2500;34function Slideshow() {5 const [index, setIndex] = React.useState(0);6 const timeoutRef = React.useRef(null);78 function resetTimeout() {9 if (timeoutRef.current) {10 clearTimeout(timeoutRef.current);11 }12 }1314 React.useEffect(() => {15 resetTimeout();16 timeoutRef.current = setTimeout(17 () =>18 setIndex((prevIndex) =>19 prevIndex === colors.length - 1 ? 0 : prevIndex + 120 ),21 delay22 );2324 return () => {25 resetTimeout();26 };27 }, [index]);2829 return (30 <div className="slideshow">31 <div32 className="slideshowSlider"33 style={{ transform: `translate3d(${-index * 100}%, 0, 0)` }}34 >35 {colors.map((backgroundColor, index) => (36 <div37 className="slide"38 key={index}39 style={{ backgroundColor }}40 ></div>41 ))}42 </div>4344 <div className="slideshowDots">45 {colors.map((_, idx) => (46 <div47 key={idx}48 className={`slideshowDot${index === idx ? " active" : ""}`}49 onClick={() => {50 setIndex(idx);51 }}52 ></div>53 ))}54 </div>55 </div>56 );57}
Now we can click on the dots as much as we want, the slideshow will still work perfectly fine: