15th January 2024 • 13 min read
Guide to fast websites with Next.js

Seif Ghezala
This article was originally published on Vercel.
At Tinloof, we're obsessed with delivering fast websites such as jewelry brand Jennifer Fisher, which went from a Shopify theme to a modern Next.js website that instantly loads with 80% less JavaScript.

When evaluating the speed of a website, they look at key metrics in a typical user journey:
Server response time: How long it takes for the user to get any feedback once landed on the page.
Page render time: How long it takes for a page to become fully visible and interactive.
User interaction time: How long it takes the user to make key interactions on the page such as navigating between pages or adding an item to the cart.
This article covers tips to measure and make each part of the user journey as fast as it gets.
The key to making your site fast and keeping it fast—for any user on any device—is data. Speed is more than just a way to gauge user experience, it's crucial for getting the top spot on any search platform and winning organic page views.
To ensure they're measuring the right data correctly, tools like Google PageSpeed Insights and Vercel Speed Insights are able to provide objective metrics. These tools can be used to diagnose page performance issues, providing insights into aspects like loading times, interactivity, and visual stability.
It's also equally important to test the user journey under various network conditions.
Combining objective tools with a hands-on approach provides a comprehensive view of a website experience, ensuring it’s optimised for all users.
Once key performance metrics are evaluated, the team is able to pinpoint where and how to make improvements in things like server response.
When possible: Pre-render the entire page
Pre-rendering the page at build-time ensures it is served from a CDN instead of your origin server, resulting in the fastest server response possible. This is done automatically by Next.js if you don’t use the edge runtime and the page doesn’t rely on cookies, headers, or search parameters.
Cache fetch requests for fast server responses when using loading spinners
Loading shells are not an excuse for slow server responses. Most server responses can be cached instead of making the user wait for them on every page visit. Although this is the default behaviour of fetch requests in Next.js, you can still control the freshness of this data:
By revalidating the server response every x number seconds.
1//app/page.tsx23export default function Home() {4 // The CMS data is guaranteed to be fresh every 2 minutes5 const cmsData = await fetch(`https://...`, { next: { revalidate: 120 } });67 return <h1>{cmsData.title}</h1>8}9
Or by revalidating the server response when a certain event happens. Here’s an example where a CMS response is revalidated whenever a new CMS page gets published.
1//app/page.tsx23export default function Home() {4 // The CMS data is cached until the tag is revalidated5 const cmsData = await fetch(`https://...`, { next: { tags: ['landing-page']);67 return <h1>{cmsData.title}</h1>8}
1//app/api/revalidate/route.ts23import { revalidateTag } from 'next/cache';4import { NextRequest, NextResponse } from 'next/server';56export async function POST(req: NextRequest): Promise<NextResponse> {7 const secret = req.nextUrl.searchParams.get('secret');8 const tag = req.nextUrl.searchParams.get('landing-page');910 if(!tag || !isValid(secret)) {11 return NextResponse.json({ status: 400});12 }1314 return revalidate(tag);15}
The Next.js guide on caching and revalidation and the App Router explainer video are perfect to help understand these concepts.
Short answer: Make the browser do the least amount of work to render the page.
Once the browser receives a response from the server, it still has to paint the entire page and make it ready for user interactions (e.g. button clicks).
While parsing the HTML and rendering, the browser is also downloading resources such as CSS, JavaScript, font, or image files.
The following tips help make page render fast by making the browser do as little work as possible.
Reduce the JavaScript bundle size and minimize the impact of hydration
The JavaScript shipped with React websites usually consists of React, Next.js, the application code including the JSX of every single React component, and third-party dependencies.
Once the page HTML is rendered and the JavaScript is downloaded, React goes through a process called “hydration” where it attaches event listeners and state to the components of the page.
Just by using React Server Components you already get a speed bump because:
Their JavaScript (including application code, JSX, and third-party dependencies) is not shipped to the browser.
React skips their hydration.
When a component requires interactivity (e.g. state, event listeners), a use client directive can be used to convert it to a client component which in addition of being rendered in the server, also has its JavaScript shipped to the browser and is hydrated by React.
Only use client components when necessary
URLs can be used to store a component state without having to make it a client component that relies on React’s state.
It requires less code to manage the state, turns state buttons to links that work even without JavaScript, and makes it possible to persist the state on page refresh or when sharing the URL.
Place client components in the leaves of the page tree
To minimize the JavaScript footprint of imported child components, it’s a good practice to place client components the furthest possible at the bottom of the components tree.
Be mindful of third-party dependencies’ bundle sizes
Any client component dependency is more JavaScript for the browser to download, parse, and execute.
Tools such as pkg-size can be used to determine the size impact of NPM packages based on what’s imported from them and help decide between alternatives.
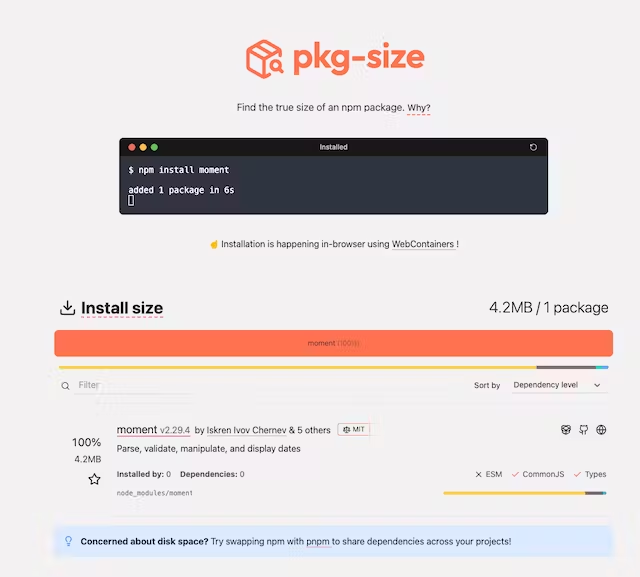
Measure bundle size with pkg-size
Lazy-load client components when possible
Even when a client component is necessarily heavy, it’s still possible to only download its JavaScript once it’s rendered.
For example, the stockists page on Jennifer Fisher uses mapbox-gl, an extremely heavy package, to display interactive maps.
Since mapbox-gl is only used to display maps, its wrapper client component is lazy-loaded so the package bundle is only downloaded when the component is rendered.
You can lazy-load a client component either via next/dynamic or a combination of React.lazy and Suspense , more details can be found on Next.js guide on the topic.

Efficiently load third-party scripts
Some third-party dependencies like Google Tag Manager are injected via script tags instead of imports in client components.
@next/third-parties can be used to reduce their impact on page render speed and if dependency is not supported, next/script is also a great option.
Some web fonts are unnecessarily heavy because they include characters not even needed by the website.
In the case of Jennifer Fisher, Tinloof was able to trim out more than 50% of font files using tools such as transfonter.
next/font makes it possible to load local and Google Fonts while providing the following optimizations:
Only load fonts on pages where they are used.
Preload fonts to make them available early on when rendering.
Use display strategies such as swap to avoid blocking text rendering by using a fallback font.
Short answer: use next/image when you can.
The next/image component provides so many optimizations for local or remote images.
A detailed guide is available on Next.js docs so I’ll only highlight some of them:
Images are automatically served in modern efficient formats such as AVIF or WebP that preserve quality and dramatically reduce the download size.
Images are only loaded when visible in the viewport and a
lazyboolean prop is available to do the opposite for critical images.A
preloadprop is available to make the browser load critical images ASAP.Images are automatically served in different sizes based on the viewport and props such as
sizesorloaderare available to customise the behaviour.Local images can automatically show a placeholder while loading and you can provide a
blurDataURLto achieve the same with remote images.
The next/image component is just a very handy utility and is not required to achieve the benefits above:
Images can still be served in modern formats by using CDNs that can convert them on the fly.
Lazy-loading images is a native browser attribute that can be used by default.
Images can be preloaded using a preload link
<link rel="preload" as="image" href="..." />in the document’sheador usingReactDOM.preload.When loading images from a different domain, it’s a good practice to use preconnect links to inform the browser to establish a connection with the image provider domain early-on.
Solutions such as Mux, Cloudinary, or CDNs such as Fastly can be used to help optimise video delivery by serving videos as close as possible to users.
A poster image is a must-have for any video and you can either manually set it or easily extract the first frame of the video to be the poster image when using any video CDN.
The best part is that you can use the same image optimizations tips discussed earlier to render the poster image efficiently.
Here’s an example Mux video component that utilises these optimizations and it’s only rendered on the server:
1import { preload } from "react-dom";2import { unstable_getImgProps as getImgProps } from "next/image";34type Props = {5 playbackId: string;6 loading: "lazy" | "eager";7 resolution: "SD" | "HD";8};910export default function MuxVideo({ playBackId, loading, loading }: Props) {11 const mp4Url = `https://stream.mux.com/${playbackId}/${12 resolution === "SD" ? "medium" : "high"13 }.mp4`;1415 const webmUrl = `https://stream.mux.com/${playbackId}/${16 resolution === "SD" ? "medium" : "high"17 }.webm`;1819 // Use `getImgProps` to convert the video poster image to WebP20 const {21 props: { src: poster },22 } = getImgProps({23 src: `https://image.mux.com/${playbackId}/thumbnail.webp?fit_mode=smartcrop&time=0`,24 alt: "",25 fill: true,26 });2728 // Preload the poster when applicable29 if (loading === "eager") {30 preload(poster, {31 as: "image",32 fetchPriority: "high",33 });34 }3536 return (37 <video38 autoPlay39 playsInline40 loop41 controls={false}42 muted43 preload="none"44 >45 <source src={mp4Url} type="video/mp4" />46 <source src={webmUrl} type="video/webm" />47 </video>48 );49}
For videos that are not required to load immediately, you lazy-load them without causing any layout shift:
1'use client';23import Image from 'next/image';4import { useEffect, useState } from 'react';5import useInView from '~/hooks/useInView';6import Video, { VideoProps } from './Video';78export default function LazyLoadedVideo(props: VideoProps) {9 const { ref, inView } = useInView({ triggerOnce: true });1011 return (12 <>13 {!inView ? (14 <Image15 ref={ref as React.RefObject<HTMLImageElement>}16 alt={'Video poster'}17 src={props.poster ?? ''}18 className={props.className}19 style={props.style}20 loading={'lazy'}21 layout="fill"22 />23 ) : (24 <Video {...props} />25 )}26 </>27 );28}
The HTML document is a critical resource the browser has to download and parse.
Use virtualization
Components such as carousels/sliders, tables, and lists are also usual culprits.
You can use libraries such TanStack Virtual to only render items when they are visible in the viewport while avoiding any layout shifts.
Short answer: Provide feedback to the user as early as possible.
Some user interactions such as URL state navigations when filtering or adding an item to the cart rely on server responses, which are not always immediate, causing slow interactions or leaving the user puzzled on whether something went wrong.
Optimistic UI techniques can be used to make such interactions snappy and provide immediate feedback to users.
The idea is to use JavaScript to show the predicted result to the user without waiting the server to return a response.
It can be achieved either through normal React state management or using React’s useOptimistic hook.
Fast websites are more pleasant to use, more engaging to users, and it’s no surprise they directly impact success metrics such as conversion rate and search engine indexation.
Although the tips above are focused on Next.js, the concepts behind them can be used to make any website faster.