3rd May 2019 • 10 min read
ReasonML for production React Apps? (Part 2)

Seif Ghezala
I like to go to the Roadmap of ReasonML from time to time to get excited about what's getting cooked. Whenever I visit the page, I can't help but notice these 2 points:
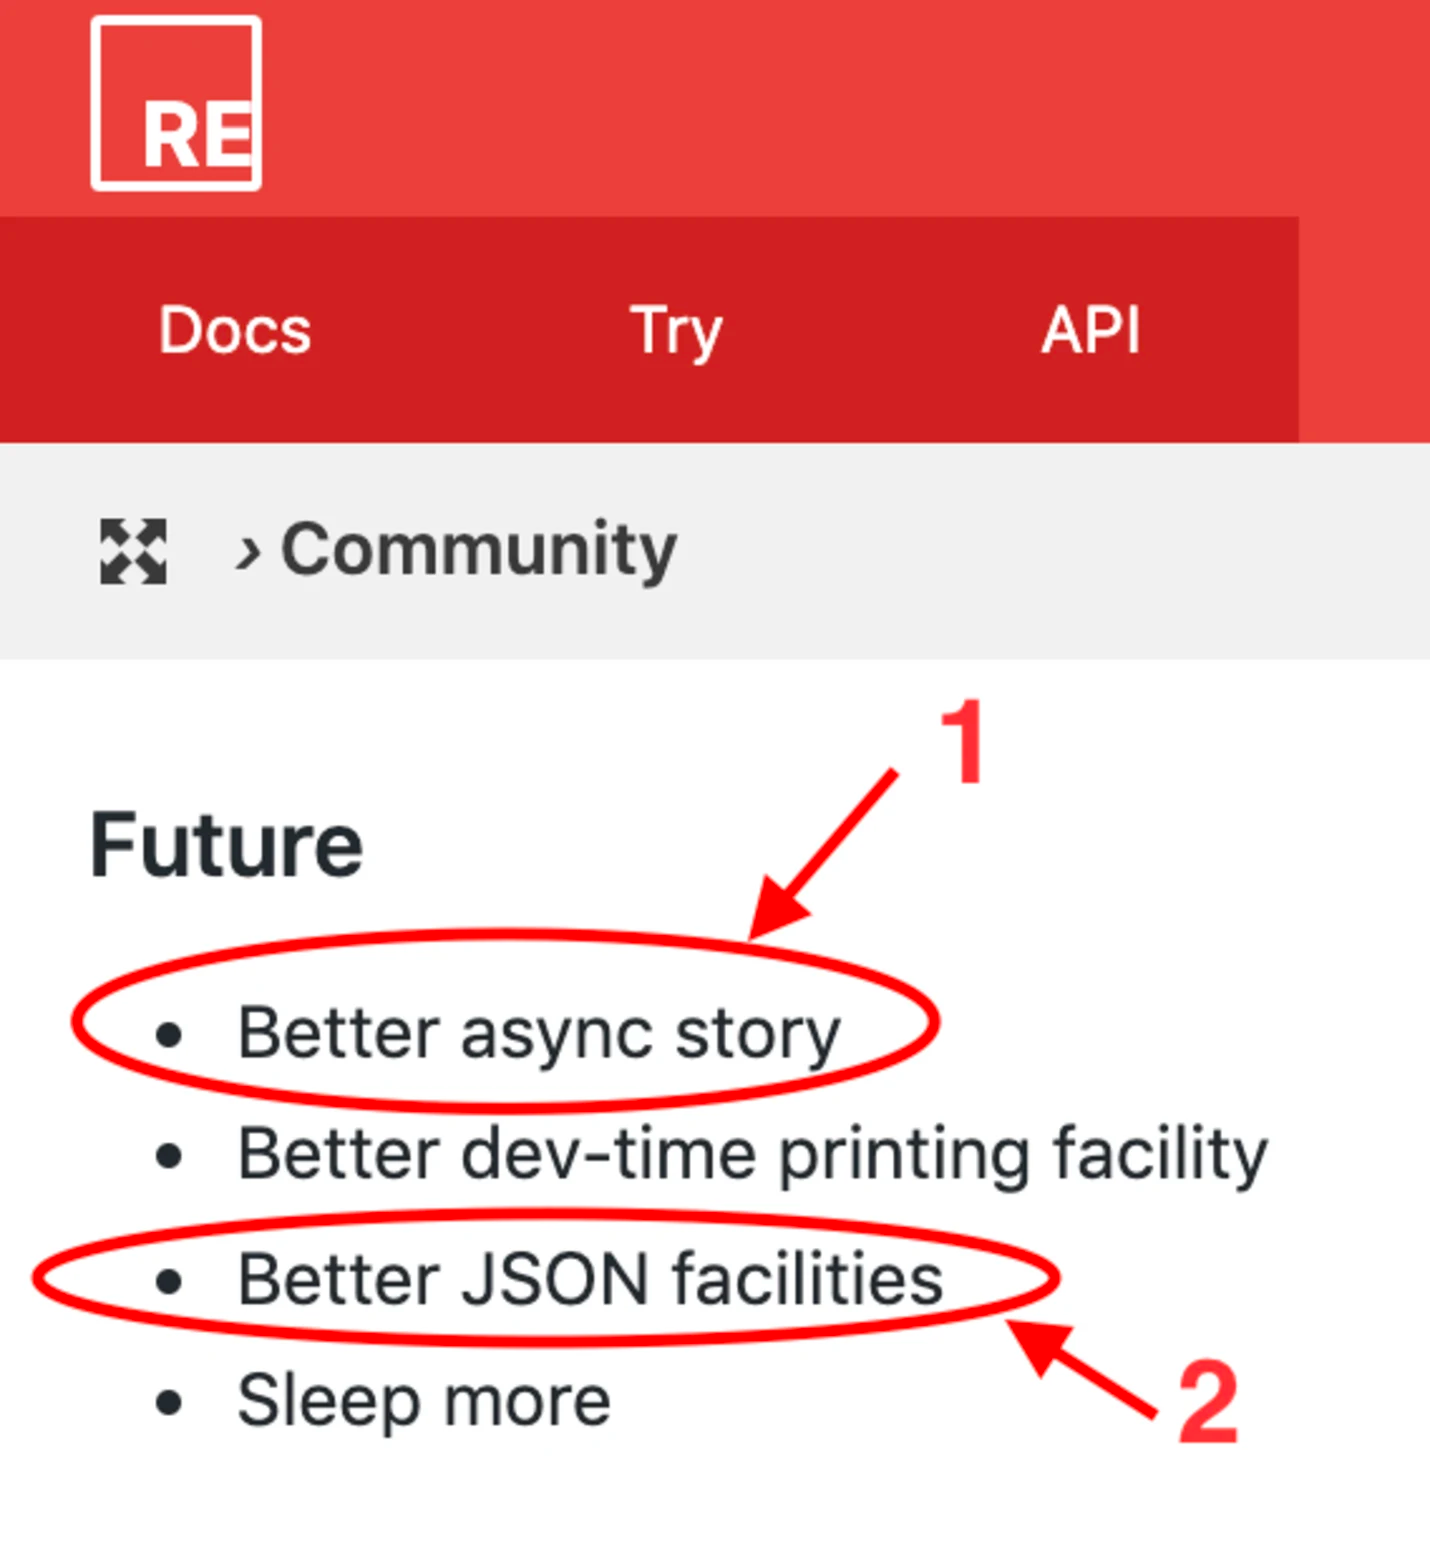
ReasonML Roadmap
So the official documentation itself admits that the async story and JSON handling are not that great.
This is exactly why, in this second part of the series, we'll build a simple Login page for our words counter. By doing that, I'm pretty sure we will bump into these 2 points among other things and have a better overview of building React applications in Reason.
Just like the previous part, I will approach building this feature in iterations and report what I like/dislike.
This article is the third part in a series. Access Part 1 here, Part 3 here and Part 4 here.
You can find the final code here.

Final Result
Our application will no longer be just a words counter page. Therefore, we have to move the content of the App component into a separate component and create another component for the Login page.
1/* src/Home.re */23[%bs.raw {|require('./Home.css')|}];45let countWordsInString = text => {6 let spacesRegex = Js.Re.fromString("\s+");78 switch (text) {9 | "" => 010 | noneEmptyText =>11 noneEmptyText12 |> Js.String.trim13 |> Js.String.splitByRe(spacesRegex)14 |> Js.Array.length15 };16};1718module Times = {19 [@bs.module "./icons/times.svg"] [@react.component]20 external make: (~height: string) => React.element = "default";21};2223module Copy = {24 [@bs.module "./icons/copy.svg"] [@react.component]25 external make: (~height: string) => React.element = "default";26};2728module CopyClipboard = {29 [@bs.module "react-copy-to-clipboard"] [@react.component]30 external make: (~text: string, ~children: React.element) => React.element =31 "CopyToClipboard";32};3334[@react.component]35let make = () => {36 let (text, setText) = React.useState(() => "");3738 let handleTextChange = e => ReactEvent.Form.target(e)##value |> setText;3940 let handleClearClick = _ => setText(_ => "");4142 let wordsCountText =43 (text |> countWordsInString |> string_of_int) ++ " words";4445 <div className="Home">46 <div className="header">47 <h3> {"Words Counter" |> ReasonReact.string} </h3>48 <span> {ReasonReact.string(wordsCountText)} </span>49 </div>50 <textarea51 placeholder="Express yourself..."52 value=text53 onChange=handleTextChange54 />55 <div className="footer">56 <Button57 title="Clear text"58 onClick=handleClearClick59 disabled={String.length(text) === 0}>60 <Times height="20px" />61 </Button>62 <CopyClipboard text>63 <Button64 title="Copy text"65 disabled={String.length(text) === 0}66 category=Button.PRIMARY>67 <Copy height="20px" />68 </Button>69 </CopyClipboard>70 </div>71 </div>;72};
The App component is also refactored to just render a Home component:
1/* src/App.re */23[@react.component]4let make = () => {5 <div className="App"> <Home /> </div>;6};
So far, we've just made minor changes and there is nothing for me to like/dislike.
To make it possible to navigate to our Home and Login pages, we need to add a Router.
Let's first build a simple Login page that we can navigate to:
1/* src/Login.re */23[@react.component]4let make = () => {5 <div className="Login"> <h1>{ "Login Page" |> ReasonReact.string }</h1> </div>;6};
ReasonReact comes with a built-in Router: ReasonReactRouter. The Router provides a hook, useUrl(), to consume the current url. To implement navigation, we just have to render a different page component based on the url path we consume from the useUrl() hook:
1/* src/App.re */23[@react.component]4let make = () => {5 let url = ReasonReactRouter.useUrl();67 let page =8 switch (url.path) {9 | [] => <Home />10 | ["login"] => <Login />11 | _ => <div> {"Page not found :/" |> ReasonReact.string} </div>12 };1314 <div className="App"> page </div>;15};
I like 👍
The built-in Router's API is pretty straight-forward.
Pattern-matching over the url path will always remind you not to forget a fallback page, otherwise, it's not exhaustive.
I can imagine that routing based on certain conditions can be implemented very easily and elegantly since routing is based on pattern-matching.
We've set up the navigation to the Home and Login pages, so let's put actual content in the Login page. To start, let's create a Login template with an email and password fields that store their values in the state:
1/* src/Login.re */23[%bs.raw {|require('./Login.css')|}];45[@react.component]6let make = () => {7 let (email, setEmail) = React.useState(() => "");8 let (password, setPassword) = React.useState(() => "");910 let handleEmailChange = e => ReactEvent.Form.target(e)##value |> setEmail;11 let handlePasswordChange = e =>12 ReactEvent.Form.target(e)##value |> setPassword;1314 let handleFormSubmit = e => {15 ReactEvent.Form.preventDefault(e);16 /* TODO: add logic for submitting the form */17 };1819 <div className="Login">20 <h2> {"Login" |> ReasonReact.string} </h2>21 <form onSubmit=handleFormSubmit>22 <div className="inputField">23 <input24 type_="email"25 placeholder="Email"26 value=email27 onChange=handleEmailChange28 required=true29 />30 </div>31 <div className="inputField">32 <input33 type_="password"34 placeholder="Password"35 value=password36 onChange=handlePasswordChange37 required=true38 />39 </div>40 <Button title="Login" category=Button.PRIMARY>41 {"Login" |> ReasonReact.string}42 </Button>43 </form>44 </div>;45};
Here's how the Login page looks like:
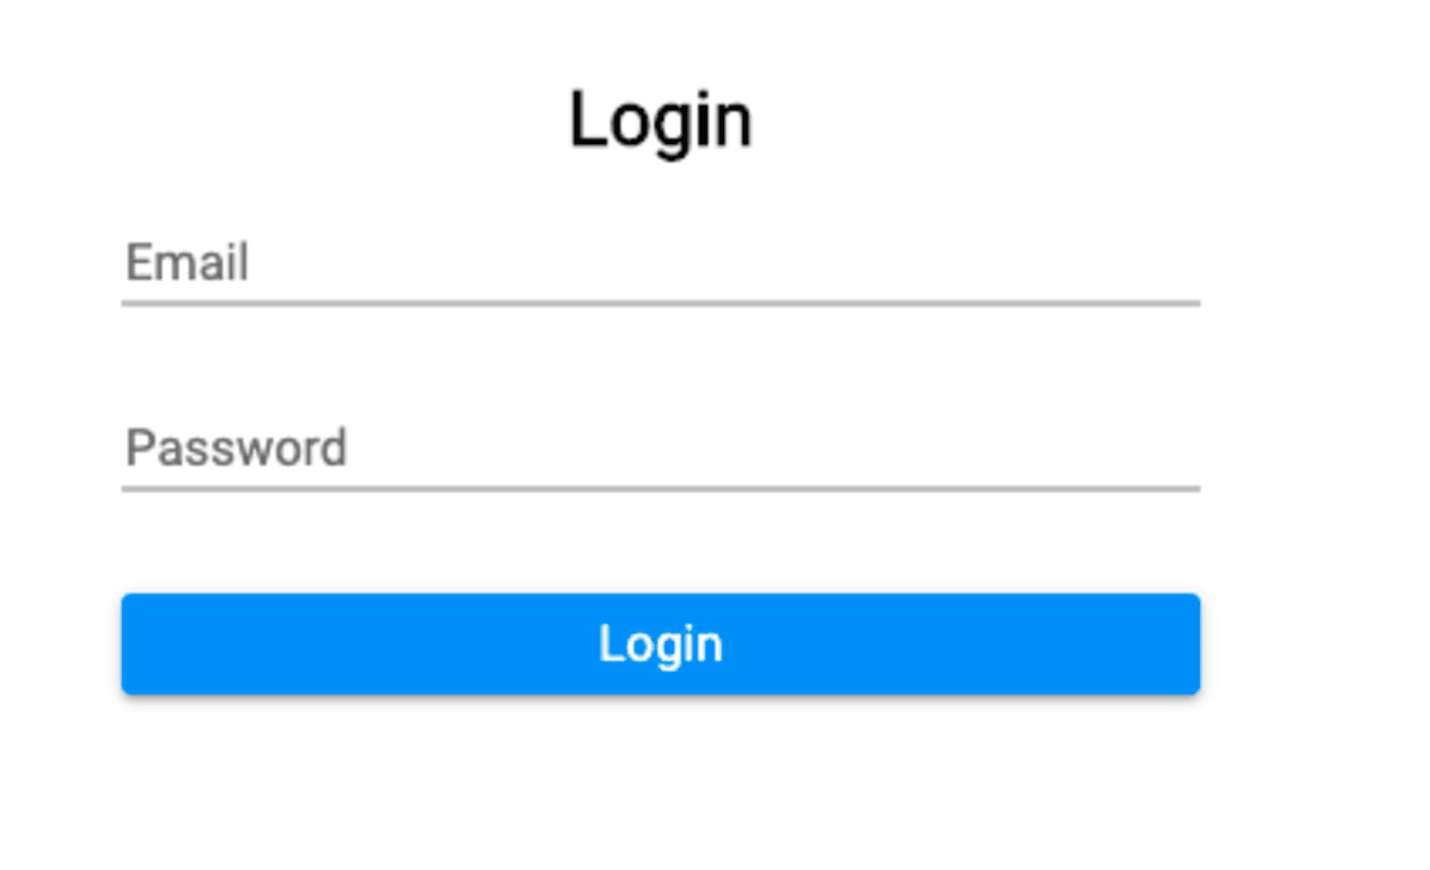
Login page
I like
I can say I became quite fast with ReasonReact, despite the few things I dislike and that I mentioned in the previous part (e.g. having to use ReasonReact.string and ReactEvent.Form.target).
Before jumping into the form submit implementation, I want our component first to be able to handle potential errors.
To do so, let's create a Variant that handles 3 possible errors:
EMAIL_NOT_FOUND
INVALID_PASSWORD
OTHER (e.g. error when the user is blocked)
1type loginError =2 | EMAIL_NOT_FOUND3 | INVALID_PASSWORD4 | OTHER;
Since server errors messages are strings, let's create a helper function that converts the string into a Variant:
1let stringToLoginError = str =>2 switch (str) {3 | "EMAIL_NOT_FOUND" => Some(EMAIL_NOT_FOUND)4 | "INVALID_PASSWORD" => Some(INVALID_PASSWORD)5 | _ => None6 };
Now, we want to add an error field to our state. Since, at any point, we can either have an error or not, the field should be of type option(loginError).
Once we have that, it becomes pretty easy to conditionally render an email or password error using pattern-matching:
1/* src/Login.re */23[%bs.raw {|require('./Login.css')|}];45type loginError =6 | EMAIL_NOT_FOUND7 | INVALID_PASSWORD8 | OTHER;910let stringToLoginError = str =>11 switch (str) {12 | "EMAIL_NOT_FOUND" => Some(EMAIL_NOT_FOUND)13 | "INVALID_PASSWORD" => Some(INVALID_PASSWORD)14 | _ => Some(OTHER)15 };1617[@react.component]18let make = () => {19 let (email, setEmail) = React.useState(() => "");20 let (password, setPassword) = React.useState(() => "");21 let (error, setError) = React.useState(() => None);2223 let handleEmailChange = e => ReactEvent.Form.target(e)##value |> setEmail;24 let handlePasswordChange = e =>25 ReactEvent.Form.target(e)##value |> setPassword;2627 let handleFormSubmit = e => {28 ReactEvent.Form.preventDefault(e);29 /* TODO: add logic for submitting the form */30 };3132 <div className="Login">33 <h2> {"Login" |> ReasonReact.string} </h2>34 <form onSubmit=handleFormSubmit>35 <div className="inputField">36 <input37 type_="email"38 placeholder="Email"39 value=email40 onChange=handleEmailChange41 required=true42 />43 {switch (error) {44 | Some(EMAIL_NOT_FOUND) =>45 <div className="error">46 {{js| ⚠ Email not found |js} |> ReasonReact.string}47 </div>48 | _ => ReasonReact.null49 }}50 </div>51 <div className="inputField">52 <input53 type_="password"54 placeholder="Password"55 value=password56 onChange=handlePasswordChange57 required=true58 />59 {switch (error) {60 | Some(INVALID_PASSWORD) =>61 <div className="error">62 {{js| ⚠ Invalid password |js} |> ReasonReact.string}63 </div>64 | _ => ReasonReact.null65 }}66 </div>67 <Button title="Login" category=Button.PRIMARY>68 {"Login" |> ReasonReact.string}69 </Button>70 </form>71 </div>;72};
I like
Variants give confidence when dealing with different error types. By relying on them, you end up handling explicitly the different types of errors.
When we submit the form, we want to make a login post request to the backend. If there is an error with the user's credentials, well, we're ready to handle it. If the login is successful, we will just log a success message.
How do you make requests from the browser? You use the global function fetch.
I usually create a wrapper on top of fetch to make POST/GET requests for the following reasons:
Avoid repetitive boilerplate.
When the request fails, the fetch promise doesn't. So I usually check the status of the response and either resolve the promise or fail it based on it (c.f. the code below).
Here's how my fetch wrapper for post requests usually looks like in JavaScript:
1export async function post(url, body) {2 let response = await fetch(url, {3 method: "POST",4 credentials: "include",5 body: typeof body === "string" ? body : JSON.stringify(body),6 headers: {7 "Content-Type": "application/json",8 },9 mode: "cors",10 });1112 if (response.status >= 200 && response.status < 300) {13 return response;14 }1516 throw response;17}
I can then use it anywhere else:
1try {2 const response = await post("some/url", { foo: "bar" });3 const jsonContent = await response.json();4} catch (e) {5 // do something with the error6}
Let's try to do the same in ReasonML. There are no built-in bindings to fetch in Reason, so we'll have to use bs-fetch.
1/* src/Request.re */23let post = (url, payload) => {4 let stringifiedPayload = payload |> Js.Json.object_ |> Js.Json.stringify;56 Fetch.fetchWithInit(7 url,8 Fetch.RequestInit.make(9 ~method_=Post,10 ~body=Fetch.BodyInit.make(stringifiedPayload),11 ~headers=Fetch.HeadersInit.make({"Content-Type": "application/json"}),12 (),13 ),14 );15};
The function fetchWithInit of the bs-fetch module Fetch is used to make a fetch call with configuration. We pass to it the url and a configuration we make with Fetch.RequestInit.make().
So far, this returns a promise.
Did I mention that I was using Firebase as a backend for authentication? Well, I am using Firebase as a backend for authentication.
Authentication errors returned by Firebase are JSON objects, so we have to use the response.json() method to extract the error object out of a response.
Thus, we want to extract the JSON content out of the fetch response. To do that, we can use the Fetch.Response.json function:
1/* src/Request.re */23let post = (url, payload) => {4 let stringifiedPayload = payload |> Js.Json.object_ |> Js.Json.stringify;56 Fetch.fetchWithInit(7 url,8 Fetch.RequestInit.make(9 ~method_=Post,10 ~body=Fetch.BodyInit.make(stringifiedPayload),11 ~headers=Fetch.HeadersInit.make({"Content-Type": "application/json"}),12 (),13 ),14 ) |> Js.Promise.then_(Fetch.Response.json)15};
Since we will be using then_ catch, resolve, and reject often, we can open the Js.Promise module so that we don't have to prepend them with Js.Promise at every call:
1/* src/Request.re */23let post = (url, payload) => {4 let stringifiedPayload = payload |> Js.Json.object_ |> Js.Json.stringify;56 Js.Promise.(7 Fetch.fetchWithInit(8 url,9 Fetch.RequestInit.make(10 ~method_=Post,11 ~body=Fetch.BodyInit.make(stringifiedPayload),12 ~headers=Fetch.HeadersInit.make({"Content-Type": "application/json"}),13 (),14 ),15 )16 |> then_(Fetch.Response.json)17 );18};
Just like the JavaScript json() function, Fetch.Response.json() returns a promise that resolves with an object of type Js.Json (you can see that in the editor if you hover over it).
If we want to extract any data from an object of type Js.Json, we'll have to convert it into a Js.Dict (dictionary/map) object using the function Js.Json.decodeObject(). This returns an option, since the JSON response can be empty or simply not an object. Therefore, we will have to use pattern-matching to handle both cases and extract the Js.Dict value:
1/* src/Request.re */23let post = (url, payload) => {4 let stringifiedPayload = payload |> Js.Json.object_ |> Js.Json.stringify;56 Js.Promise.(7 Fetch.fetchWithInit(8 url,9 Fetch.RequestInit.make(10 ~method_=Post,11 ~body=Fetch.BodyInit.make(stringifiedPayload),12 ~headers=Fetch.HeadersInit.make({"Content-Type": "application/json"}),13 (),14 ),15 )16 |> then_(Fetch.Response.json)17 |> then_(response => {18 switch (Js.Json.decodeObject(response)) {19 | Some(decodedRes) => {20 resolve(decodedRes);21 }22 | None => resolve(Js.Dict.empty())23 }24 })25 );26};
Now that we have the response object, we need to check if it has an error or not. If the content has an error object, we reject the Promise with an exception containing the error message. Therefore, we will have to create a custom exception type for that. Otherwise, we resolve the Promise with a Js.Dict object containing the response:
1/* src/Request.re */23exception PostError(string);45let post = (url, payload) => {6 let stringifiedPayload = payload |> Js.Json.object_ |> Js.Json.stringify;78 Js.Promise.(9 Fetch.fetchWithInit(10 url,11 Fetch.RequestInit.make(12 ~method_=Post,13 ~body=Fetch.BodyInit.make(stringifiedPayload),14 ~headers=Fetch.HeadersInit.make({"Content-Type": "application/json"}),15 (),16 ),17 )18 |> then_(Fetch.Response.json)19 |> then_(response =>20 switch (Js.Json.decodeObject(response)) {21 | Some(decodedRes) =>22 switch (Js.Dict.get(decodedRes, "error")) {23 | Some(error) =>24 reject(25 PostError(26 "There is an error, but we don't know its message yet",27 ),28 )2930 | None => resolve(decodedRes)31 }32 | None => resolve(Js.Dict.empty())33 }34 )35 );36}
All that we have to do now is extract the error message from the Js.Json error, the same way we extracted the error object from the response. The only difference is that the message is a string and not an object:
1/* src/Request.re */23exception PostError(string);45let post = (url, payload) => {6 let stringifiedPayload = payload |> Js.Json.object_ |> Js.Json.stringify;78 Js.Promise.(9 Fetch.fetchWithInit(10 url,11 Fetch.RequestInit.make(12 ~method_=Post,13 ~body=Fetch.BodyInit.make(stringifiedPayload),14 ~headers=Fetch.HeadersInit.make({"Content-Type": "application/json"}),15 (),16 ),17 )18 |> then_(Fetch.Response.json)19 |> then_(response =>20 switch (Js.Json.decodeObject(response)) {21 | Some(decodedRes) =>22 switch (Js.Dict.get(decodedRes, "error")) {23 | Some(error) =>24 switch (Js.Json.decodeObject(error)) {25 | Some(decodedErr) =>26 switch (Js.Dict.get(decodedErr, "message")) {27 | Some(errorMessage) =>28 switch (Js.Json.decodeString(errorMessage)) {29 | Some(decodedErrorMessage) =>30 reject(PostError(decodedErrorMessage))31 | None => reject(PostError("POST_ERROR"))32 }33 | None => resolve(decodedRes)34 }35 | None => resolve(decodedRes)36 }3738 | None => resolve(decodedRes)39 }40 | None => resolve(Js.Dict.empty())41 }42 )43 );44};
That's it, let's see in the next iteration whether our module works or not.
But before that, here's what I like/dislike:
I like
Js.Promise always returns a Promise. This makes their returned value much more predictable than promises in JavaScript, which can either return a Promise or a value.
Js.Post always returns a Promise that resolves with a Js.Dict. It's pretty hard to have an error by using it since its return type is predictable.
Although it was a REAL struggle to extract an error message from the response, I have to admit that it was bullet-proof. I managed to make it work before even looking at the browser.
I dislike
The syntax of the bs-fetch API is quite unnatural.
Although accessing a JSON value is safe, it's undeniably a pain and easily results in a nesting hell that is very hard to read.
Iteration #6: using the Request module in the Login page
We've built a nice module to make POST requests, let's use in the Login page.
Before doing that, we have to handle one issue: we can't directly access an exception from a rejected Promise. Let's follow the official BuckleScript example and build a small helper function that extracts our exception from a rejected Promise:
1 let handlePromiseFailure =2 [@bs.open]3 (4 fun5 | Request.PostError(err) => {6 err;7 }8 );
We can now make our POST calls in the handleFormSubmit function:
1/* src/Login.re */23 let handleFormSubmit = e => {4 ReactEvent.Form.preventDefault(e);5 let payload = Js.Dict.empty();6 Js.Dict.set(payload, "email", Js.Json.string(email));7 Js.Dict.set(payload, "password", Js.Json.string(password));89 Js.Promise.(10 Request.post(loginUrl, payload)11 |> then_(res =>12 {13 alert("Login successful!");14 setError(_ => None);15 }16 |> resolve17 )18 |> catch(e =>19 (20 switch (handlePromiseFailure(e)) {21 | Some(err) => setError(_ => stringToLoginError(err))22 | None => setError(_ => None)23 }24 )25 |> resolve26 )27 |> ignore28 );29 };
To test the Login form, I created the following user:
1{ "email": "demo@demo.com", "password": "demodemo" }And here's the final outcome:
Final Login form
That's it! The Login page works exactly as we wanted it to! 🎉
I dislike
The extra step I have to make to extract an exception from a rejected Promise.
Keep reading the next part of this series here.
Test