26th December 2022 • 3 min read
How to create CSV uploader with Sanity?

Burak Tarım
We built the Betty's Eddies website for our client marimed. You can read more about our case study about Betty's Eddies.
Betty's Eddies technology stack is; NextJS for the frontend, and Sanity for the CMS and we coded it with typescript.
Betty's Eddies has a stores page that includes many stores around the USA and they want to add a store list with a CSV file.
And lucky for us, Sanity is a very powerful and flexible CMS. It offers us to customize the studio with React components.
In this article, we will build a CSV uploader to create a bunch of new documents from CSV files.
1.Create CSV uploader action component.
2.Add component to document actions.
3.Set up CSV parser.
4.Save data to Sanity.
This component is called action. Document actions help you to perform and modify the document actions. You can read more about document actions from Sanity docs here.
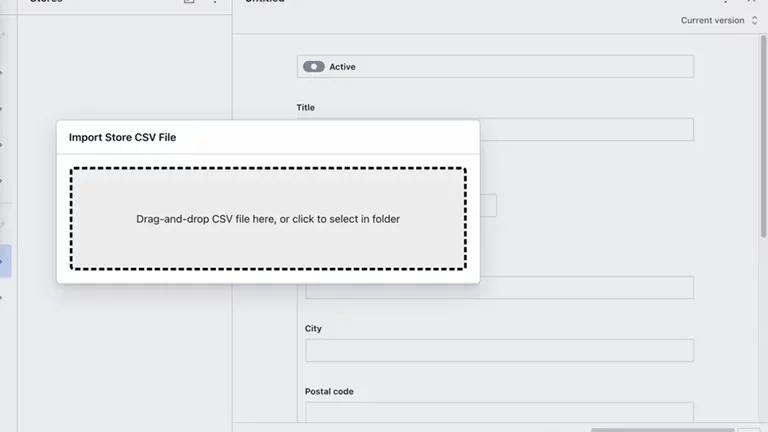
We are going to create a file called csvUploader.tsx|jsx under actions folder. (You can create it if you don't have one). Document actions are React components that returns a json with attributes like label, dialog, onHandle etc.
1import React from 'react'23export default function CsvUpload({ onComplete }) {4 const [dialogOpen, setDialogOpen] = React.useState(false)56 return {7 label: `Import CSV file`,8 onHandle: () => {9 setDialogOpen(true)10 },11 dialog: dialogOpen && {12 type: 'modal',13 header: 'Import Store CSV File',14 content: <></>,15 },16 }17}18
We can customize the document action list using this document action resolver function.
Create a ./actions.tsx file under your Sanity root folder and export a function that returns the document actions list.
In this function, we are checking the document type, and based on the type either we return defaultActions or we return defaultActions and our csvUpload action.
1import defaultActions from 'part:@sanity/base/document-actions'2import CsvUpload from '../actions/CsvUpload'34const resolveDocumentActions = (props) => {5 let actions = defaultActions(props)6 const { type } = props78 if (type === 'store') {9 return [...actions, CsvUpload]10 }1112 return actions13}1415export default resolveDocumentActions16
Lastly, you can tell sanity to use this function by adding it to sanity.json's parts array.
1{2 //Rest of the json...3 "parts": [45 {6 "implements": "part:@sanity/base/document-actions/resolver",7 "path": "./actions.tsx"8 },9 ]10}
In this article, we are gonna use a npm package called react-csv-importer you can check it from it's npm page.
This package will help the user to map the CSV columns. It will parse it to a JSON array and give it back to us as array chunks.
1import React from 'react'2import { Importer, ImporterField } from 'react-csv-importer'3import 'react-csv-importer/dist/index.css?raw'45export default function CsvUpload({ onComplete }) {6 const [dialogOpen, setDialogOpen] = React.useState(false)78 return {9 label: `Import CSV file`,10 onHandle: () => {11 setDialogOpen(true)12 },13 dialog: dialogOpen && {14 type: 'modal',15 header: 'Import Store CSV File',16 content: (17 <Importer18 assumeNoHeaders={false}19 restartable={false}20 processChunk={async (rows, { startIndex }) => {}}21 onClose={async ({ file, preview, fields, columnFields }) => {22 onComplete()23 }}24 >25 <ImporterField name="title" label="Title" />26 <ImporterField name="street" label="Street" optional />27 <ImporterField name="city" label="City" optional />28 <ImporterField name="state" label="State" optional />29 <ImporterField name="postalCode" label="Zip Code" optional />30 <ImporterField name="website" label="Website" optional />31 </Importer>32 ),33 },34 }35}36
We created the action document, added it to the action resolver, and set up the CSV importer, and now it's time to save data to sanity.
Since the CSV importer gives data to use as a JSON array, all we have to do is loop through it and save it using the Sanity client.
1async function addStores(rows) {2 for (let i = 0; i < rows.length; i++) {3 const item = rows[i]45 const storeObj = {6 _type: 'store',7 title: item.title,8 website: item.website,9 active: true,10 address: {11 city: item.city,12 street: item.street,13 postalCode: item.postalCode,14 },15 }1617 await client.create(storeObj)18 }19 }
And we are going to call this function from the processChunk callback.
1.2.3content: (4 <Importer5 assumeNoHeaders={false}6 restartable={false}7 processChunk={async (rows, { startIndex }) => {8 await addStores(rows)9 }}10 onClose={async ({ file, preview, fields, columnFields }) => {11 onComplete()12 }}13 >14.15.16.
In this article, we built a CSV uploader using Sanity document actions. Now our client can upload their stores using CSV files.